![iPost-GRADIENT-1.png]](https://www.ipost.com/hs-fs/hubfs/iPost-GRADIENT-1.png?width=100&height=43&name=iPost-GRADIENT-1.png)
Configuring an Advanced Test for a Journey Automation
An Advanced Test activity for a Journey Automation varies from a Process Automation because of the nature of the journeys. The same concept is applied in that you can test various parts of an email send within your Journey Automation, but the audience and how the test duration process works differs because of the nature of Journey sends themselves.
Journeys are built for a continuous drip of contacts entering and flowing down the various paths in the journey. Because of this, there is not specific audience selected and the test segment process continues over a longer period of time.
Configuration Step
To begin configuring your Advanced Test, fill out the information in the initial tab. This tab consists of the basic information for the Advanced Test and allows you to define your audience.
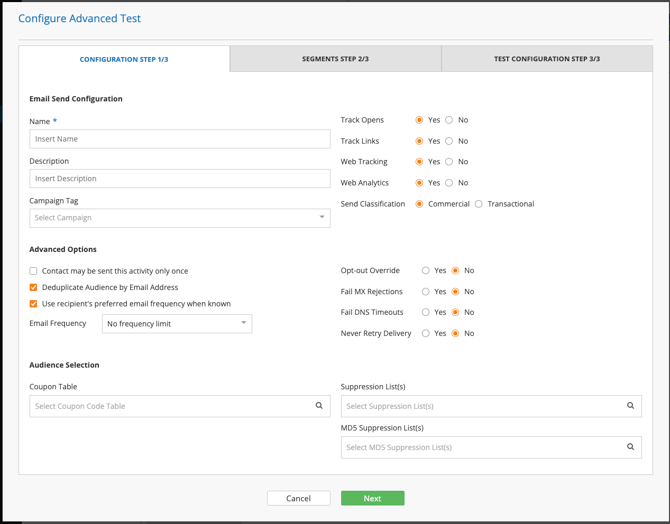
Email Send Configuration
| Field Name | Description |
|---|---|
| Name | The name given to the automation and Advanced Test. This is editable and can be changed as needed. |
| Description | Enter a description for this Advanced Test. |
| Campaign Tag | Select a Campaign Tag for the Advanced Test. |
| Track Opens | Enable Open Tracking for the Advanced Test. This is set to Yes by default. |
| Track Links | Enable Click Tracking for the Advanced Test. This is set to Yes by default. |
| Web Tracking | Enable Web Tracking for the Advanced Test. If Web Tracking is configured for your client, this option will be defaulted to Yes. |
| Web Analytics | Enable Web Analytics for the Advanced Test. If Web Analytics is configured for your client, this option will be defaulted to Yes. |
| Send Classification | Select the Send Classification for the Advanced Test. |
Advanced Options
| Field Name | Description |
|---|---|
| Contact May be Sent This Activity Only Once | If selected, any contacts who have passed through this automation previously will be suppressed. |
| Deduplicate Audience By Email Address | Deduplicates the audience by email address ensuring one email is sent to each recipient. This option is enabled by default. |
| Use Recipient's Preferred Email Frequency When Known | Allows you to send based on the recipient's email frequency if this feature is enabled on your account. |
| Email Frequency | Allows you to suppress sending to contacts who have received an email in the previous X number of days. |
| Opt-out Override | If yes, send messages regardless of a contact's opt-out status. The is configured to No by default. If the Send Classification is configured to Transactional, this will update to Yes. |
| Fail MX Rejections | If yes, do not attempt to retry delivery of messages because of a MX rejection, e.g, 554 Transaction Failed. This is set to No by default. |
| Fail DNS Timeouts | If yes, do not attempt to retry delivery of messages because of a DNS timeout, e.g, not able to reach host. This is set to No by default. |
| Never Retry Delivery | If yes, the system will bypass the email retry process. |
Audience Selection
| Field Name | Description |
|---|---|
| Coupon Table | Select the iPost Coupon Table the content is using for the Coupon iTL. |
| Suppression List(s) | Use this field if you would like to suppress contacts found on a list. |
| Suppression Data Table(s) | Use this field if you would like to suppress contacts found in a sendable data tables. |
| MD5 Suppression List(s) |
Use this field if you would like to suppress records found on a MD5 Suppression List. |
Please note, a minimum of 100 contacts are required to configure an advanced test.
Once you have completed the Configuration Step, click Next to move to the Segments Step.
Segments Step
The Segments Step for a Journey Automation is the same as in an Process Automation. You will define the email content that will be used in the Journey itself. You have the option of using the same email content for the test segments, or selecting multiple emails to be used in the Advanced Test.
To select your email content, click on the Email field and select an email from the available content. Once selected, the other fields will populate from the email properties page for the selected email.
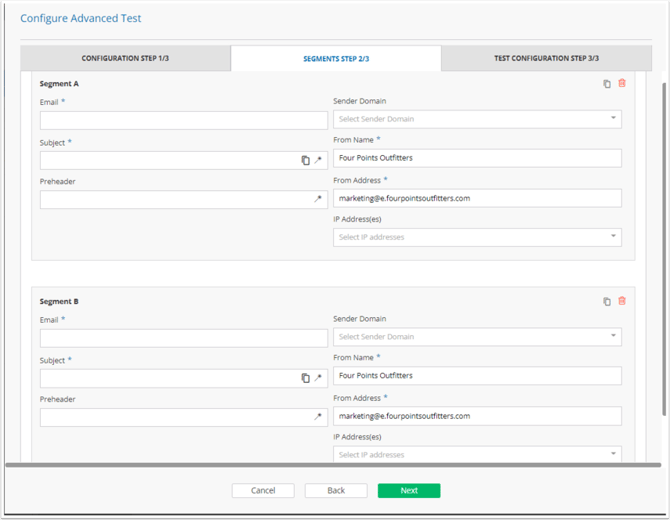
Once the Segments Step has been completed, click Next to move to the Distribution Step.
Test Configuration
Unlike with Advanced Test activities in Process Automations, Distribution Segments are set under the Test Configuration step. The default number of contacts is 500 per segment but this can be adjusted to fit your email marketing program.
The Test Duration begins once the minimum number of contacts have gone through each segment and will continue collecting data for the specified amount of time.
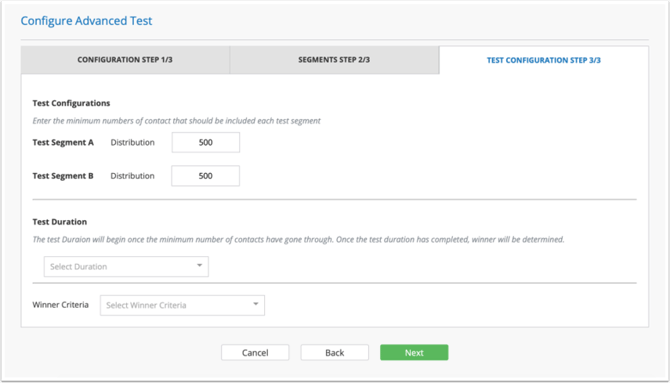
At the completion of the Test Duration period, a Winning Segment is determined based on the selected Winner Criteria.
| Winner Criteria | Description |
|---|---|
| Top Combinations | Selects the Subject Line, Preheader, and From based on the highest open rates and selects the content with the highest click rate for the winner's send. |
| Click Thru Rate | Selects the winner send based on the highest click rate. |
| Open Rate | Selects the Subject Line, Preheader, and From with the highest open rate. |
| Click to Open Rate | Selects the winner send based on the highest click-to-open rate. |
| Conversion Rate: Top Items Sold | Selects the winner based on the highest number of conversions. |
| Conversion Rate: Top Revenue Performing | Selects the winner based on the highest revenue. |
| Manual Selection | Allows you to select the winner after the test duration has completed. |
If Manual Selection is selected for the Winner Criteria, you will receive a System Notice alerting you that the Advanced Test period is complete and the results are ready for review.
To review and select the Winning Segment:
- Hover over the Report section in the left-side navigation menu.
- Select the Advanced Test Sends option under Reports.
- Locate and click on the Name of the Advanced Test.
- Review the report metrics and select the radio button next to the preferred Winning Segment.
Once selected, the winning email creative will be sent to any contacts moving through that activity going forward.
A Winner Segment is required when using the Advanced Test functionality. If you need to test without a winner segment, please split your audience and send separate emails.
Once all steps have been configured, click Next to review your Advanced Test activity and Confirm to complete the activity.
From this point, you can add any other activities that may be needed to your Journey Automation, then click Continue to save your automation. Finally, set the journey's status to Active.