![iPost-GRADIENT-1.png]](https://www.ipost.com/hs-fs/hubfs/iPost-GRADIENT-1.png?width=100&height=43&name=iPost-GRADIENT-1.png)
Account Settings
Client Info
This section displays the information used by iPost to identify your organization.
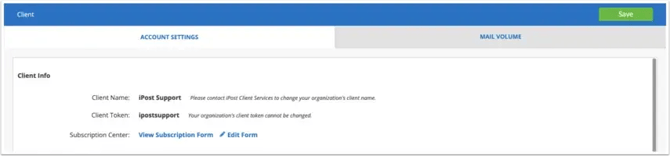
Client Name
This name is configured during set-up and may be changed by contacting your Customer Success Manager. It will also be listed on the account's native Subscription Form.
Client Token
A unique identifier used by many of iPost's automated systems and required when using the iPost API. This value cannot be changed.
Subscription Center
The standard subscription form is provided by iPost as a free service. This page allows your subscribers to opt-in or opt-out of your mailings, as well as opting-up or opting-down by selecting or deselecting public lists or topics in your iPost account.
- Click View Subscription Form to see your native preferences page. This URL is comprised of the subdomain delegated to iPost and the token assigned to your client (e.g., https://e.domain.com/form/[Client Token]/prefs). You can then add this URL to your website, allowing potential subscribers to opt-in directly to your marketing program.
- Click Edit Form to make changes to the look and feel of the form or add subscriber preference options.
Account Info
This section displays the main users contact information.
Mailing Manager: The person in charge of creating and sending mailings.
Email Address: The address where iPost should send emails about mailing setup. This dropdown menu shows all active users in your iPost account. If the primary contact's address is not in this list, please create a user account for that person.
FTP Settings
The FTP Settings section allows you to set a time frame for how long files should be retained on your iPosts FTP site. The default setting is 3 months. The minimum retention period is 1 week and the max retention period is 6 months. Click here to read more about your iPost FTP.
Time Settings
This section allows you to set a default time zone, date format, and time format.
Default Time Zone: The time used for mailing history events.
Date Format: Choose the date format you prefer. By default, iPost accepts YYYY-MM-DD. However, you can select another date format if needed.
Time Format: Choose the time format for your iPost account. When importing data, use the selected date format for datetime fields.
Default Values for Emails
These settings are used to provide defaults for new email tickets.
From/Display Name: The name associated with your email address as displayed in the subscriber's inbox.
Reply To: Utilizing your delegated subdomain, this email address will be used to send your mailings and will be displayed in the subscriber's Inbox.
List Owner: This value populates an Internet Engineering Task Force standard email field that is intended to identify an administrator who can deal with any difficulties experienced by the recipients of the mailing. It should contain a valid email address or be blank.
Sender Postal Address: The postal address of the brand or company sending the email. You must include your postal address in each mailing.
Document Preview Address: This allows you to set a default email address which will be used for personalizing the preview of emails.
Automation Error Notification: The email address that automation error notifications should default to.
Mailing Duration: How long your mailing will be scheduled to run by default. This field is used to set the allow deliveries/forwards date for each ticket, which can be adjusted in the ticket Advanced Settings.
Track System Fields: Enabling this feature will track clicks on the native opt out link, the View in Browser link, and the Forward to a Friend link.
Extended Services
Custom Domain Name
A custom domain name can significantly enhance your brand awareness by incorporating your company name (or other chosen words) into your tracked URLs. This is achieved by delegating a subdomain to iPost. For instance, if you allocate the domain "enews.MyCompany.com," the redirect URLs in your email content will appear as follows:
http://enews.MyCompany.com/rd/9z1z...
For more information on delegating a subdomain, read our Subdomain Delegation Guide.
Mail Volume
The Mail Volume tab contains information related to your contracted email volume as well as the ability to generate a mail volume report based on a specific timeframe.
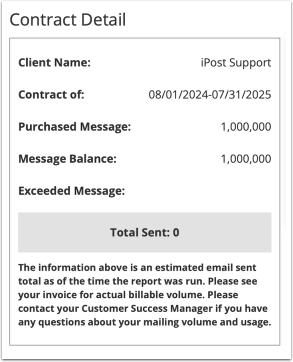
Contract Details
The Contract Details outlines the current contract terms for your account. For subclients, this information is inherited from the parent account.
Client Name: Refers to the name of the client associated with the contract. For a subclient, this will display the name of the parent account.
Contract Of: Indicates the contract start and end dates.
Purchased Message: Represents the total email volume as stated in the contract.
Message Balance: Shows the total remaining email volume left in the contracted term.
Exceeded Message: Displays the total number of emails sent over the contracted email volume.
Total Sent: Indicates the total number of emails that have been sent.
Mail Volume Report
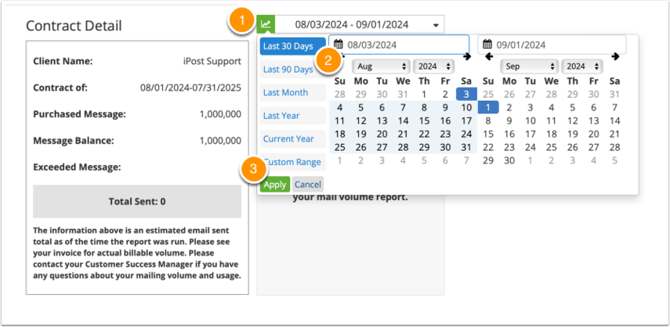
The Mail Volume tab also allows you to create a report of the total email volume sent based on a specific time frame. To create a mail volume report, follow these steps.
- Click on the green Report icon next to the date range.
- Select your date range from the available options or create a custom date range.
- Click Apply to generate the report.
The mail volume report can also be run across all sub-clients for a client. To run the report for all sub-clients, follow these steps.
- Go to the parent account for the client.
- Access Client in the Settings menu.
- Click on the Mail Volume tab.
- Click on the green Report icon next to the date range.
- Select your date range from the available options or create a custom date range.
- Check the box next to Sub Client.
- Click Apply to generate the report.
The report will generate below the Contract Details box. The mail volume report can be downloaded by clicking the Download Report button.
