![iPost-GRADIENT-1.png]](https://www.ipost.com/hs-fs/hubfs/iPost-GRADIENT-1.png?width=100&height=43&name=iPost-GRADIENT-1.png)
Creating a Dynamic Data Table
To create a Dynamic Data Table:
- On the Data Table Manager page, enter the name of the custom data table in the Create New Data Table field. The name of the custom data table can only contain characters, numbers, and underscores.
- Select Dynamic Data Table as the content type.
- Click on Create.
Once the data table has been created, you will be brought to the properties page to create the data fields.
Properties
The top portion of the properties page provides you with the standard information about the custom data table.
| Object | Description |
| Name | The name of the custom data table. |
| Description |
A description given to the custom data table. This field is optional. |
| Folder Location | The location of the data table in the folder tree of the data table manager. |
| Refresh Table on Sending | This enables a refresh of the filter criteria every time the table is used in an email send. This ensures that the contacts for the table still meet the filter criteria. |
| Send Email Notifications To | If populated, an email notification will be sent to the email address entered in the field. |
| Records | The number of contacts contained within the data table. |
| Content Type | The type of data table. |
| Created Date | The date the data table was created. |
| Created By | The user who created the data table. |
| Modified Date | The date the data table was last modified. |
| Modified By | The user who last modified the data table. |
Click Continue to save the Dynamic Data Table and move to the Filter step.
Filter and Data Selection
The Filter & Data Selection page allows you to create the criteria used to populate the dynamic data table. The page is divided in two sections: Attributes and Filters.
Attributes
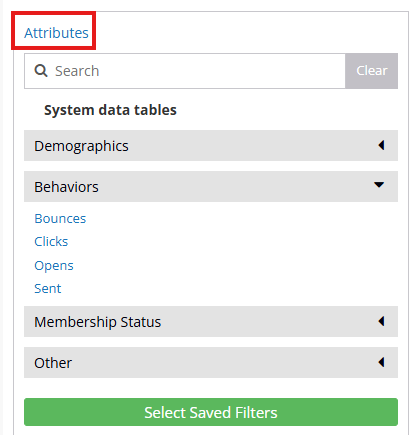
The Attribute section of the filter area is where you can find data fields for creating your filter. The available data fields include:
- System data tables - a set of predefined tables compiled from an account's All Contacts (demographics) database, contact engagement, mailing history, and membership status.
- Custom data tables
- Saved Filters
Available System Tables
| System Table | Description |
| Demographics | Includes any field names (columns) that are in the All Contacts database. If most contact data is in custom data tables, these fields may not be relevant. |
| Behaviors | Includes various System Tables for filtering contacts’ actions on an email send. • Bounces: filter contacts based on bounce status. • Clicks: filter contacts based on email clicks. • Opens: filter contacts based on email opens. • Sent: filter contacts based on sent emails. |
| Membership Status | Allows you to filter contacts by Opt-In status for a Topic, List, or your All Contacts. |
| Other | Filter by a Recipient’s Domain, interaction with a configured Category, or Platform used by contacts to view an email. |
Select Custom Data Tables
Select Custom Data Tables allows you to select one or more custom data tables to be used in the Filter Criteria.
To select a Custom Data Table:
- Click the Select Custom Data Table button.
- On the Select Table page, either search for the custom data table(s) or use the folder tree to locate the custom data table(s).
- Click on the Name of the table to be included in the filter criteria.
- Click Done.
Once the custom data table(s) is selected, it will appear under the Custom Data Table section.
Select Saved Filters
Select Saved Filters enables you to choose a previously saved filter. When a saved filter is selected, the filter criteria will appear in the Define Filter area, allowing you to modify the criteria as required. To select a saved filter:
- Click on the Select Saved Filters button.
- The Select Saved Filter page allows you to locate the filter you will be using.
- The most recently created filters are located in the top section. If using one of these, simply click the box next to the filters name.
- The Search option will allow you to search through all Saved Filters.
- All Saved Filters will populate in the bottom section, or if searching, your search results will appear here. Click on the name of the filter in order to utilize it.
- Click Done.
Once the filter is selected, the filter name will populate in the Custom Data Table section and the filter criteria will be within the Defined Filter area.
Filters
Filters enable you to construct the rule set for populating the dynamic data table. The left-hand side comprises the source fields for creating the dynamic data table, which can be fields within a System Table or a Custom Data table. On the right-hand side, you can build the filter by dragging an element from the Attribute section into the Define Filter section. From there, you can configure the operators and logic for your filter.
Creating Filter Criteria
To create filter criteria, drag a Data Field from the Attribute options and drop it onto the
Define Filter area. Once the data field is dropped, you can then select the Operator and define the Value for the field you wish to filter.
You can combine different filter conditions together with AND/OR logic operators. By default, the logic operator will be an OR. The AND/OR logic operators are located in a button on the right side of the Define Filter Area. To change the logic operator, click on this button.
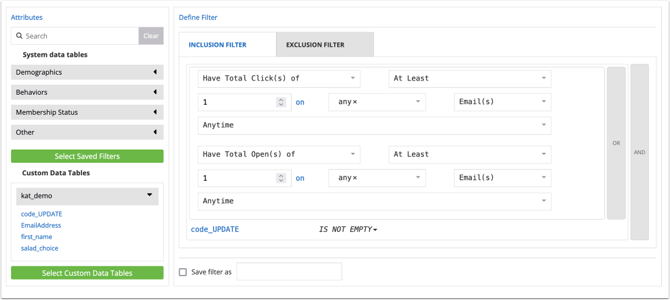
Filter conditions can also be combined in order to define a hierarchy of the conditions.
- To group filter conditions, a minimum of three data fields must be present in the Define Filter Area.
- Place your mouse at the end of the grouping before the
AND/ORlogic operator button until a gray button appears. - Click on the gray button to create a grouping.
Once a grouping is created, an additional AND/OR logic operator option will appear. This can be changed as needed to meet the filter conditions.
You are also able to save your filter to use again by checking the Save filter as option and providing a name for the filter. The saved filters can be found in the Saved Filters option under Contacts.

Operators
Below is a list of available operators for Dynamic Data Tables.
| Data Type | Operator |
| Text | Is / Is Not Contains / Does Not Contain |
| Number | Equal To / Not Equal To Less Than Greater Than Between Like / Not Like Is Null / Is Not Null Begins With Ends With |
| Boolean | Is 0 Is 1 |
| Date | Is Equal / Is Not Equal Is After Is on or After Is Before Is on or Before Is Null / Is Not Null Matches Day Matches Month Matches Day and Month Matches Year |
| Radius Search | Zip Code |
Table Attributes
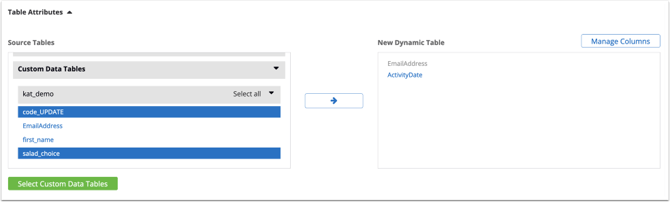
Within the Table Attributes section, you are able to define which fields you would like to include for the Dynamic Data Table from the Source Tables option. This includes data fields from System Tables and the ability to select Custom Data Tables.
System Data Table
The System Data Tables house all system tables and their data points. In order to view the available system tables, click the System Data Table bar. From here, you can click on the bar of any of the data tables to see the available fields for output.
Select Custom Data Table
If a Custom Data Table was used in the filter criteria, it will be available in the Source Tables. Click on the Custom Data Tables bar to view the data table then select the name of the Custom Data Table to see any available data fields.
If you would like include data fields from other custom data tables, they must first be added to the Source Tables options.
To select Custom Data Tables, follow the steps below.
- Click the Select Custom Data Table button.
- On the Select Table page, either search for the custom data table(s) or use the folder tree to locate the custom data table(s).
- Click on the Name of the table to be included in the filter criteria.
- Click Done.
Once the Custom Data Table(s) is selected, it will appear under the Custom Data Table bar.
Selecting Fields for New Dynamic Table
To select fields for output, follow the steps below.
- Select one or more data fields from the Source Table. If selecting all of the data fields from a Custom Data Table, use the Select All option.
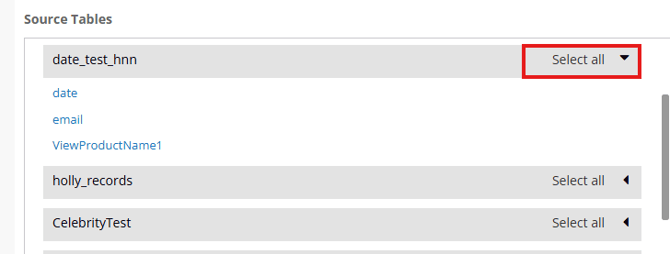
- Click the blue Arrow button to add the selected attributes to your New Dynamic Table.
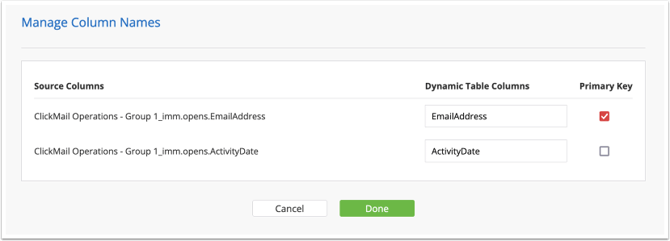
- Click Manage Column to enter a new name for your field in the dynamic data table and set a Primary Key(s) on any of the fields.
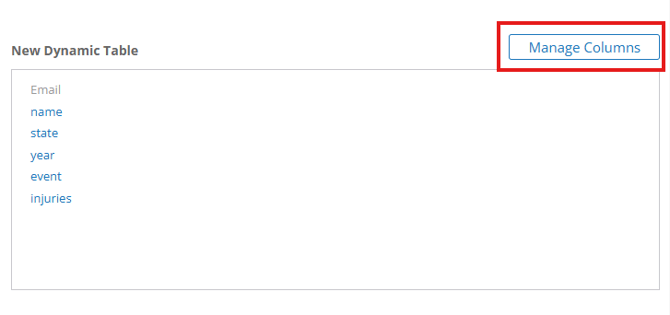
- Click Done once finished.
- Data Fields will then populate the New Dynamic Table box.
If you decide that you no longer want to include certain fields, they can be removed from the New Dynamic Table box by clicking on their name and then clicking on the left arrow.
Using Your Dynamic Data Table for Sending
To ensure your Dynamic Data Table can be used in an email send, you will need to set the sending properties. To do so, select one or more of the following options located at the bottom of the Table Attributes section.

- Sending - enable the dynamic data table for use in email sends.
- Testing - enable the dynamic data table for use in test email sends; the maximum number of contacts for Test-type tables is 20.
Once Sending or Testing is enabled, click Connect to select the Recipient Key for your new Dynamic Data Table. The Recipient Key is the field in your data table that identifies a contact; it should be the same field that identifies contacts in your All Contacts database.
- For most accounts, this will be the Email field type attribute.
- For UID enabled accounts, this will be the UID field type attribute.
Finally, choose the column in your new dynamic data table that contains a contact's email address.
Once your filter criteria has been built and your table attributes set, you can click Continue in the upper right corner to move onto the next step.
Relationships
Relationships help connect different system or custom data tables using a common data field. This is necessary when using multiple data tables. Any existing persistent relationships for the selected tables in your filter will be automatically displayed. If not, relationships must be created before compiling your filter results.
Keep in mind that all tables used for the filter and the resulting Dynamic Table must be linked by a number of relationships equal to the number of tables involved minus one.
Creating a Relationship
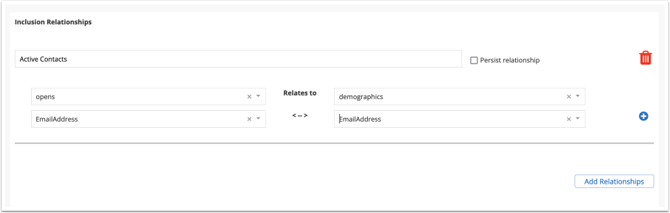
To create a relationship, follow the steps below.
- Click on the Add Relationship button.
- Enter a name in the Insert Relationship Name field.
- Click the Persist relationship option if you would like to save the relationship.
- Select the First System or Custom Data Table from the Select Table dropdown.
- Select the Common Data Field in the Select Attribute dropdown below it.
- Select the 2nd System or Custom Data Table from the second Select Table dropdown.
- Select the Common Data Field in the second Select Attribute dropdown below it.
- Click on the Add Relationship button if another relationship is needed.
- Click Continue when done.
Records
The results of your filter criteria will appear on the Records Preview page. It will include all contacts that meet the filter criteria and all output fields selected. Click on the Save button to apply any Primary Keys and to save the results to the Dynamic Data Table. If you leave the page before Save is applied, your data table will be empty.
Once the Record page is populated, additional icons will be available.
Split
Split allows you to split the Dynamic Data Table into multiple Custom Data Tables.
To split a table, follow the steps below.
- Click on the Split icon.

- On the Split Table page, select the number of branches you would like to split the table into. The default number of branches is two (A & B), each with an equal number of records.
- Select how you would like to divide the contacts into the new branches:
- Split by Number of Records - split the table by a specific quantity per branch.
- Split by Percentage - split the table by a percentage per branch.
- For either split type, editing one input will automatically adjust the next input so the total number of records remain accurate.
- Click the Lock icon next to the branch identifier to prevent the quantity or percentage from changing.
- Once each branch is complete, click Split to divide the records into new tables.
Refresh
Refresh allows you to refresh the filter in order to update the results.
Export
Export allows you to export the contacts out of the Dynamic Data Table to the CDT_OUT directory (folder) in your FTP. An email notification will be sent when the export is available.
To export a Dynamic Data Table:
- Click on the Export icon.
- Your email address will be populated in the Send a Data Export Summary Report To box.
- Click Done.
Clean
Clean will empty the results from the Dynamic Data Table. The results can be populated again by refreshing the filter.