![iPost-GRADIENT-1.png]](https://www.ipost.com/hs-fs/hubfs/iPost-GRADIENT-1.png?width=100&height=43&name=iPost-GRADIENT-1.png)
The iPost Journey Automation has been enhanced with new ejection criteria and flow controls, as well as additional activities to set subscribers on varying paths within your marketing program.
Building a Journey
Once a journey automation has been created, follow the simple steps below to build out your email marketing program.
- Configure your entrance options and ejections criteria as needed for your email marketing program.
- Configure your entry event.
- From the left-hand navigation, begin to drag and drop the various activities and flow control onto the journey canvas. The various flow controls can be configured as needed to meet your email marketing program.
- Click Save in the upper right-hand corner to save your journey.
- Once the journey has been built and saved, be sure to update the status to Active to activate it.
Journey Properties
The table below lists the Journey Automation properties with their description.
|
Field Name |
Description |
|---|---|
|
Name |
The name given to the automation. This is editable and can be changed as needed. |
|
Description |
Allows you to enter a description for this automation. |
|
Folder Location |
The name of the folder where the automation exists. You can click on the field to change the folder location for the automation. |
|
Reports Folder |
The name of the folder where the journey report exists. You can click on the field to change the folder location for the report. |
|
Pause the journey on error |
Allows you to pause the journey if an error occurs on an activity. When paused, the contacts will not enter the journey; instead, they will be entered into a Queue. This field is defaulted to Yes upon journey creation. |
|
Send error notifications to |
Insert an email address into this field if you would like to be notified if there is an error with the automation. This field will default with the email address from the Client Settings page. The email address entered must exist as a contact in your account. |
|
Automation Type |
This will populate with Process Automation or Journey Automation depending on the type of automation created. |
|
Entry Event |
This will populate with the Entry Event for the automation once the journey has been configured. |
|
Created Date |
The date the automation was created. |
|
Created By |
The name of the user who created the automation. |
|
In Journey/Exited/Ejected |
This will populate with the number of contacts that are in journey, exited, or ejected once a journey has been activated. |
|
Eject All Contacts |
This will allow you to eject all contacts currently in the journey. This option will be enabled if a journey has a status of Stopped. |
Journey Canvas
The canvas of the Journey automation is where you will build out the journey your contacts will enter. The Journey Canvas consists of multiple elements.
- Status: shows the current state of the journey.
- Entrance Criteria: define how many times a contact can enter the journey.
- Entry Events: determine how a contact enters the journey.
- Ejection Criteria: define when a contact should be removed from the journey.
- Activities: the actions that take place within the journey.
- Flow Controls: direct how contacts move through the journey.
Journey Status
Journey Automation can have four different statuses: Draft, Active, Paused, and Stopped. The status of the journey can be changed from the Automation Manager or the journey canvas. Depending on the status of the Journey, different controls are available to you within the Automation Manager or Properties Page.
- Draft: status given to a journey upon the creation of the automation. The automation will stay as draft until the status is changed. While in draft, no contacts will enter the journey.
- Active: contacts will begin to enter the automation and travel on the journey path. On the Automation Manager and the properties page, you will be able to see the number of contacts who have entered, exited, or were ejected from the journey.
- Paused: no contacts will enter the journey. Instead the contacts will be queued for when the journey is activated again. You will be able to see the number of contacts queued from the Automation Manager and properties page.
- Stopped: no contacts can enter the journey and contacts are not queued. Changing a journey from paused to stopped will also clear all contacts from the queue. When a journey is stopped, you will have the additional option of ejecting contacts from the journey. To Eject All Contacts in the journey:
- On the Properties page of the journey, click the Eject All Contacts option.
- Click OK on the confirmation page.
The status for journeys paused longer than 14 days will automatically be updated to Stopped.
Entrance Options
Entrance Criteria determine how many times a contact may enter the journey.
- Allow multiple instances of a contact at the same time: A contact may be inserted into the journey multiple times and may exist at various points of the journey.
- Allow a contact only once: A contact may be inserted into the journey only once.
- Allow a contact multiple times, never at the same time: A contact may be inserted into the journey multiple times, but the contact can only exist in the journey at one time. Once the contact has exited, they are available to be inserted again.
Entry Events
Entry Events define how the contacts will be entering the Journey.
API
Configure the entry event to trigger the journey via an API call. If using this option, nothing else needs to be done in the platform.
List/Table
List/Table enables you to configure the entry event of the journey to allow only subscribers associated with a specific list or data table to enter the journey. To configure a List/Table entry event:
- Select List/Table from the Entry Events option.
- For Source, select if you will be using a List or Data Table.
- Select the audience that will be used as the source of the journey.
- Click Next.
- Select your sending configuration option:
-
All Contacts From a List/Data: Table will send to all contacts that currently reside on the list/data table when the journey is activated.
-
Only to those contacts which have been recently added into the list: only send to new contacts added after the journey is activated and not to any contacts that currently reside in the list/data table.
-
All Contacts from a list and continue sending to new contacts that are added to the list after initial send: send to everyone who currently resides on the list/data table and will continue to add to any new contacts added after the journey is activated.
-
- Click Done.
Scheduled Polling
Scheduled Polling allows for contacts associated with a specific list or data table to enter the journey at a specified time. To configure a Scheduled Polling entry event:
- Select Scheduled Polling from the Entry Events option.
- For Source, select if you will be using a List or Data Table.
- Select the audience that will be used as the source of the journey.
- Click Next.
- Select your sending configuration option:
- All Contacts From a List/Data Table: send to all contacts that currently reside on the list/data table when the journey is activated.
- Only to those contacts which have been recently added into the list: only send to new contacts added after the journey is activated and not to any contacts that currently reside in the list/data table.
- All Contacts from a list and continue sending to new contacts that are added to the list after initial send: send to everyone who currently resides on the list/data table and will continue to add to any new contacts added after the journey is activated.
- Click Next.
- Select a date from the Schedule Date field. This will be the date the contacts will be initially added to the journey.
- Select a time and time zone from the Schedule Time options. This will be the time that the contacts will be added to the journey. This time zone will default to the time zone set on the General Settings page.
- Select the Recurrence for the automation. The default is None (run once).
- Click Done.
Ejection Criteria
Ejection Criteria are rules that are configured to determine when a contact should be removed from a journey. They are based on actions the contact has taken, such as opening an email, or determined by filter logic that you create. When a contact enters a journey, the Ejection Criteria is applied to determine if the contact can continue in the journey or should be ejected. The Ejection Criteria consist of two options:
-
On Action: Use the drop down menus to build out the ejection rule based on actions taken by the contact or if a contact resides in a specific list or data table.
-
On Filter Criteria: Build the ejection rules using filter criteria based on system fields and/or custom data tables.
To configure Ejection Criteria:
- Click on the toggle to enable Ejection Criteria.
- Click on the Edit icon.
- Select either On Action or On Filter Criteria.
- Build out the Ejection Criteria based on the options available.
- Click Done.
Activities
An Activity is an action that will be performed during the course of the Journey. Each Activity must be configured after it has been added to the journey. To configure an Activity, click on the Edit icon while hovering over the control.
Flow Controls
Flow controls determine the path in which a contact travels throughout the journey. Each Flow Control must be configured after it has been added to the journey.
To configure a Flow Control, click on the Edit icon while hovering over the control.
Delay
Delay provides the ability to determine how much time a contact must wait before proceeding to the next activity of the journey. The default delay is 1 day. To configure a Delay:
- Select one of the two options for the Delay.
- Delay: holds a contact in the step until the timeframe for the hold has been met.
- Delay Until: holds a contact in the step for the configured timeframe, and only after that has past, will the contact be release to the next activity at the specified time.
- Select the length of the Delay.
- Click Done.
Random Split
Random Split provides the ability to create random paths for subscribers to travel on in the journey. There is a max of 10 paths that can be created with a Random Split. To configure a Random Split, follow these steps:
- Select the number of paths for your split.
- Slide the blue circle for each split to adjust the percentage of contacts that will travel down each path.
- Click Done.
Engagement Split
Engagement Split provides the ability to configure the journey based on an action (opened or clicked) taken on an email contained within the journey. To use this control, at least one email activity must be included in the journey. An Engagement Split can only be added to the journey after an email activity but it is not required to be the next control after an activity. Contacts who meet the engagement criteria, will continue down the Yes path in the journey.
To configure an Engagement Split, follow these steps:
- Select the behavior that you would like to use in the engagement split.
- Select an email from the available options in the drop down field; it is limited to only emails that are part of the journey.
- Select the time period that the contact will be held before continuing onto the next step in the journey.
- Click Done.
Decision Split
Decision Split provides the ability to create rules that determine which path of the journey a subscriber will follow. A decision split can be inserted before and after all activities. You are able to add up to 30 paths on the canvas for a single journey. To configure a Decision Split, follow these steps:
- Select a data field from the available option in the Attributes section.
- Drag the data field into the Drag and drop filters into this area field.
- Select the Operator and define the value for that field.
- Enter a Name for the path in the insert path name field. This name will appear on the canvas.
- Rename the Remainder Path, if needed.
- Click Done.
You have the option of adding more Paths by clicking on the Add Path button at the top of the Configure Decision Split page.
Conversion Split
Conversion Split provides the ability to configure the journey based if a conversion occurred from an email contained within the journey. A Conversion Split can only be added to the journey after an email activity but it is not required to be the next control in the journey. Contacts who meet the conversion criteria, will continue down the Yes path in the journey. To configure a Conversion Split, follow these steps.
- Select the behavior that you would like to use in the conversion split
- Select an email from the available options in the drop down. This field is limited to the emails that are part of the journey before the flow control.
- Click Done.
Join
Join provides the ability to join different paths within the journey. Joins can only be added to a journey before an Exit. Joins do not need to be configured. To join two branches of the journey, follow these steps:
- Drag and drop the Join control at the end of the path that will be joined to another path
- Once the Join is on the canvas, click on it and drag it over to the activity it will follow on the new path
- When the green box appears, drop the Join on the activity.
Journey Tracking View
Tracking View provides visual representation of how contacts are flowing through your marketing journeys allowing you to make real-time adjustments based on their interactions. Tracking View also provides you with greater control of the journey by giving you the tools to view, move, and eject contacts.
Canvas View
The Canvas of the Tracking View allows you to see the number of contacts that have progressed through an activity and the number of contacts currently on an activity. You can also view a weighted path that is determine by the number of contacts progressing down that path versus all contacts in the journey.
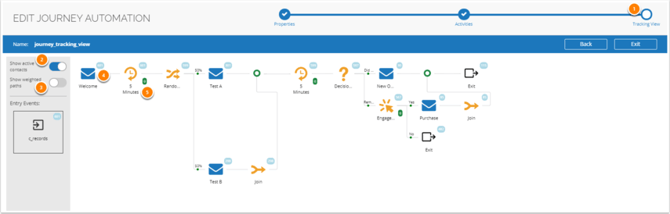
- Tracking View breadcrumb will bring you to the Tracking View page.
- Show Active Contacts will render the total number of active contacts in the tracking view in green.
- Show Weighted Paths will vary the width of the journey path based on the percentage of contacts that traveled that path.
- Total number of contacts that have passed through the activity will be displayed in blue.
- Total number of active contacts for an activity will be displayed in green.
Table View
The Table View allows you to see the contact information for any activity in the journey. From the table view you are able to export the contact data, eject contacts from the journey, or move to contacts to the next activity.
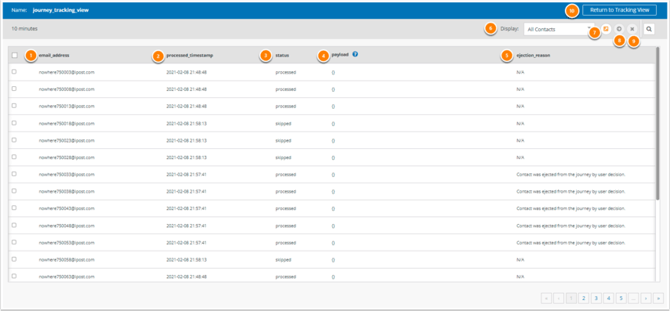
To access the table view, simply click on the entry event or any activity in the Canvas View.
- The email addresses of the contacts in the journey.
- The time the contact was processed through the activity.
- The Status for the corresponding contact.
- Active Contacts are contacts currently on the activity.
- Processed Contacts are contacts who have moved through the activity.
- Skipped Contacts are contacts that have been manually moved to the next activity.
- Payload is the data that is injected into the journey with the contact. This is populated for contacts injected into the journey via API or from a Data Table.
- Ejection Reason is populated with the reason a contact was ejected from the journey.
- Display allows you to change the display based on contact status.
- Export allows you to export the journey information for that activity.
- Move to Next Step (arrow icon) allows you to move a contact to the next activity.
- Eject (red x icon) ejects a contact from the journey.
- Return to Tracking View will take you back to the Tracking View canvas.
Editing a Journey
A Journey Automation can be edited at any time. Changes made on the journey canvas will not be implemented until the Journey is saved by clicking the Save button on the journey canvas. We recommend changing the status of the Journey to Paused if making any edits.
Clear Queue
Once contacts start to queue on the journey, you will have the ability to clear the queue. To clear the journey queue, click on the Clear Queue option from the Automation Manager or properties page.
Activating a Paused Journey
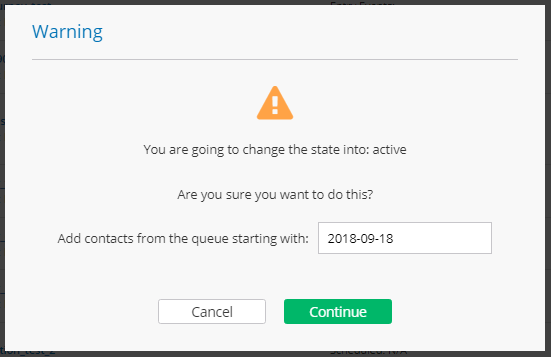
To activate a journey in a paused state, change the status from Paused to Active. During the activation process, you can determine which of the contacts should enter the journey based on the date they were added to the journey queue. Select the appropriate date in the Add contacts from the queue starting with field and click Continue.