![iPost-GRADIENT-1.png]](https://www.ipost.com/hs-fs/hubfs/iPost-GRADIENT-1.png?width=100&height=43&name=iPost-GRADIENT-1.png)
Creating a Paste HTML Email
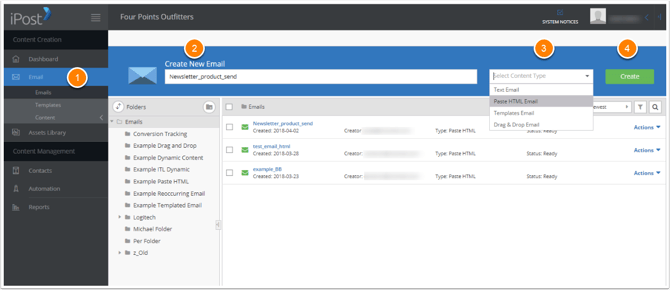
- Click on Emails in the Content Creation menu.
- Enter email name in the Create New Email field.
- Select Paste HTML Email as the Content Type.
- Click Create.
- Fill in the Properties fields (see table below for field descriptions).
- Click Continue.
- Create your Paste HTML by building the code directly in the application or drag and drop your HTML file into the workspace.
- Click Save to save your progress or Continue to validate the email's content, update the email's status, and proceed to the Preview step.
iPost will not send emails that have not passed validation or have a status of "Ready".
 Properties
The table below lists the Paste HTML Email configuration properties with their descriptions.
| Option | Description |
|---|---|
| Name | Type a brief internal description of the email. The email name is what you and other users see in your email folder. Subscribers can't see this name. This field is required. |
| Subject | Type what you would like the subject line of the email to appear as when the email is delivered. This field is required.
Dynamic Content and Personalization use the iPost Template Language (iTL). |
| Preheader | Type what you would like to appear as the preheader. A preheader is a summary of text following the subject line when an email is previewed. This field is optional.
|
| Header | Select the value to determine the header information of the send:
|
| Footer | Select the value to determine the footer information of the send:
|
| Folder Location | This field shows the email folder in which the email is stored. To change the folder the email is stored in, click the Select Folder button and choose a different folder. |
| Language | Language allows you to select the type of email encoding you would like to use. The encoding plays a major role in the way an email will be displayed, especially with respect to special characters in non-Latin languages. This field is required. Language types:
|
| Description | Description allows you to enter in additional information regarding the purpose of the email. The max number of characters allowed is 250. |
| Email Tracking Parameter | This field will appear in the properties if it is enabled on your account. It allows you to configure parameters specific to the email that can be used as tracking parameters on a URL or in the body of the email. Please refer to the Email Tracking Parameter article for more information. |
Content Builder
In addition to adding your own HTML code, the application includes a WYSIWYG (what-you-see-is-what-you-get) editor which generates the HTML code while you design. To access the WYSIWYG editor, click the Source icon in the Tools ribbon to exit Source mode.
Content Panel
The table below lists the tools available in the content panel with their descriptions.
| Option | Description |
|---|---|
| Snippet | Place the cursor in the section of the email you want to insert your stored snippet. Then, click on the Snippet tile and select the snippet. |
| Dynamic Content | Place the cursor in the section of the email you want to insert your dynamic content. Then, click on the Dynamic Content tile to select the dynamic content. |
| Insert Web Content | This feature allows you to include content in your emails directly from an outside source. |
| RSS | Place your cursor in the section of the email you want to insert the RSS content. Click the RSS tile and select the RSS Content for the email. |
| Coupon Code | Place the cursor in the section of the email you want to insert a coupon code and click on the Coupon Code tile. The coupon code iTL will be inserted into your email. |
| Campaign Genius | Use Campaign Genius Tools. Place the cursor in the section of the email you want to insert the Campaign Genius Tool. Click the Campaign Genius Tile and select the Tool for the email. |
Personalization
Click the Personalize tab to view the list of available attributes from your database. Next, drag and drop the variables into your email to add personalization iTL strings to your email content.
Plain Text
Click Plain text to create a text version of your email. You can drag and drop your text file into the workspace or autogenerate text based on your HTML by selecting Autogenerate Text in the Content menu.
Spell Check
This feature will identify words in your document that are misspelled. Click on the highlighted word for a list of correctly spelled words to replace it with. Click Save Changes when done.
Preview
Preview allows you to view how your email will look by device type, along with how the email will appear for a specific contact.
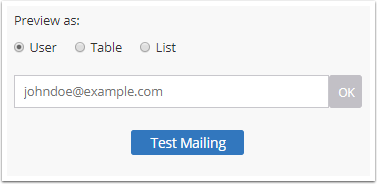
Preview as options:
| Option | Description |
|---|---|
| User | Enter a contact’s address with the desired attributes for which to preview the email and click OK. The contact must be in the system. |
| Table | Click Browse and select the Data Table with the contacts in which you would like to preview the email. At the top of the preview window you can select a specific contact to preview. |
| List | Click Browse and select the List with the contacts in which you would like to preview the email. At the top of the preview window you can select a specific contact to preview. |
Devices
View how your email will look on Desktop, Mobile and Tablet screens. Click on a tile to see how your email will look on a specific device type.
Inbox Previews
Allows you to preview your email across the most popular clients, apps and devices. To run an inbox preview test, click the Test Preview button.
| Option | Description |
|---|---|
| Client Interfaces | This option allows you to preview how your email will look in the email client’s interface. |
| Blocked Image | Include a preview of each client with image blocking enabled (where available). |